
Ingredients
Sponge cake (or use store bought)
4 large eggs, separated
¾ cup caster sugar
1 cup self raising flour
1 tbs cornflour
4 tbs hot milk
1 tbs melted butter
1 tsp vanilla extract
Pinch table salt
Chocolate icing
750g pure icing sugar, sifted (3 cups)
75g good quality dutch cocoa powder (3/4 cup)
60g unsalted butter at room temperature (soft)
1/2 boiling hot water or milk (your choice, I like the milk for the creaminess)
4 cups fine desiccated coconut or shredded if you prefer chunkier style
Raspberry Jam (or use store bought)
1 cup of fresh or frozen raspberries
1 cup of sugar
1 teaspoon of vanilla bean paste
1 table spoon of pectin (optional)
Italian Meringue Buttercream
Method
-
1.
For the sponge, preheat oven to 180°C. Line two 20cmx30cm lamington trays with baking paper.
-
2.
Beat egg whites to stiff peaks – no droopy peaks – no one likes droopy (wink wink)! Beat egg yolks, sugar and zest together for 8 to 10 minutes. Sift the dry ingredients 3 to 4 times. Sift the dry ingredients into the egg yolk mixture and fold it gently together. Then use the law of thirds to fold very gently in the egg whites. When you almost no longer see egg whites, pour into pre-lined baking trays to bake.
-
3.
Bake for 10 to 15 minutes – do not over bake this! Leave to cool then, level off the cake and cut into 5” rounds. You need 5 x 5” for the same look. To make it easier for yourself in dipping the layers later on, freeze each layer individually. Plus any left over cake, cut up a bunch of 1” x 1” cubes if you want to create the mini lamgintons I used to decorate at the end,
-
4.
For the jam, place all the ingredients into a sauce pan, mix and mash the berries as best you can - a potato masher is awesome for this job and then bring to a slow boil.
-
5.
Continue to boil, stiring while removing the froth, or what we call scunge off the top while it goods as this gives a clear, non cloudy jam.
-
6.
Continue to stir for 5 to 10 minutes until you see it all cooked through and the jam has thickened
-
7.
Take off the heat and set aside in a jar for later - I put mine into a tomato sauce bottle once it was cooled to make it easier for me later.
-
8.
Make your italian meringue buttercream as per this recipe and bag up into a piping bag with your fav star tip
-
9.
Next up is the chocolate icing - in a bowl, sieve in the icing sugar and cocoa powder, place the soft butter in a well in the middle and pour over the hot liquid (be it milk or water)
-
10.
Using a whisk, gently whisk it all together and avoid making a mess! Make sue you keep mixing until it’s nice and smooth and not lumpy. If you a time poor bitch like me, use your mixer for this. And if you were a total lazy cow and didn’t bother sieving, the lumps deserves you right, but you can fix it by getting another bowl and pushing the mixture through mesh sieve, and then you can enjoy the extra work you caused yourself for being lazy!
-
11.
In a large bowl or even better a large plate with raised sides, pour in your coconut.
-
12.
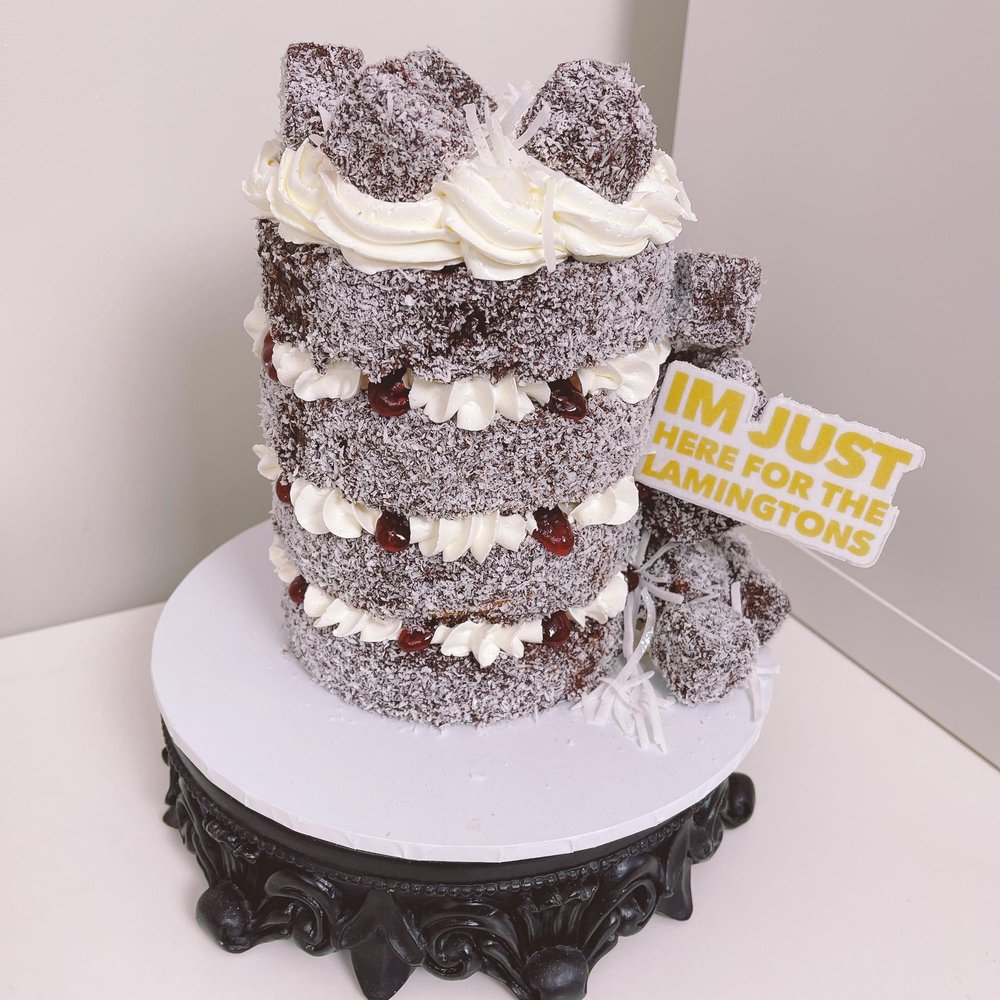
Time to construct! My fav bit!! I used a 10” white Mondo cake board for the cake you saw in the picture, but you can go smaller with a 7” or 8” - I just used a larger board as I wanted a cascade of mini lamingtons down the side of the cake.
-
13.
Bring the cake layers, the mini cakes (if you wanted mini lamingtons too), the chocolate icing, the bowl/plate of desiccated or shredded coconut, a couple of forks and something to clean your fingers with, all close together to the cake rack.
-
14.
Now if you were smart, and listed to me above and frozen your cake layers, this next bit will be easier for you to do, if you thought you would through caution to the wind and left them at room temp, good luck…. you could have at least chilled them in the fridge! You will learn to list to me!! Anyway, moving on, gently (if you have them at room temp, or throw them if frozen) place a cake layer into the chocolate icing, ensuring all sides, top and bottom are covered (if you were slow and your icing went thick, shove the bowl into the microwave for 20 seconds and continue), ease the cake out, allow the excess to drip off as much as possible.
-
15.
Now gently roll, flip and cover the layer now in coconut ensure coverage all over and place the cake layer on the cake cooling rack to set up and dry. Repeat with remaining layers. Can I highly recommend not contaminating your chocolate icing with the coconut so if you have it on your fingers, which you will have, clean your fingers between layers.
-
16.
If you are going to make the mini Lamingtons, the process is the same. You can either use forks to help you with this process or I found my More Tweezers were perfect for the job, I just used my finger in the middle to open them wider to clasp the lamington. Seethe video below to see how I did them.
-
17.
Clean up your mess and get your bench ready with a cake board, the buttercream in a piping bag, the lamington cake layers, the jam and if you have a cake turntable, that would be handy. If you are adding the mini lamingtons, I had a couple of toothpicks to help keep them in place.
-
18.
Spread a little buttercream onto the cake board, do yourself a fav and don’t spread larger than a 5” round and not thick as you will get cake if there is too much and if you go bigger than a 5”, you will see it!
-
19.
Place the first layer on the cake board, press gently but firmly to secure into place. Pipe the buttercream in a pattern you like and then add some of the jam to suit your asthetic. Place the next layer ontop and repeat. I recommend chilling between layers to help it not squash down or cake slide on a warm day - 10 mins inbetween each layer is super handy.
-
20.
Repeat until completed. On the top, I rope pipped some buttercream and now is up to you how you want to decorate. If you want it to look like mine then consider the following:
Mini lamingtons on top
cascade of mini lamingtons down the side and use tooth picks to secure them into place - I also added a little buttercream underneath the cascade to help keep them in place
extra jam on top
Shredded coconut on top and around the cascade of lamingtons
A little sparkle of More Blow in Silver Twinkle
And I printed on wafer paper a sign which I held in place with a toothpick.
Now, if all this awesome text that I took the time to type up seems too much to read through, here is the YouTube video for you!
Enjoy!
Love and Lollipops, Monica
1 comment
Hi, Just a quick question… when making the sponge, the recipe says ‘Beat egg yolks, sugar and zest together for 8 to 10 minutes’ What zest is there in this recipe and how much zest is required? I plan to make lamingtons today but am at a loss as to what the above is referring too. Thank you in advance for your reply.