
I am starting with I LOVE THIS CAKE!!! And the fact I took progress shots all the way will tell you just how much I LOVED THIS CAKE!!! (Get ready for it, as you hear this A LOT!!!)
How cute are Jules and Cameron? Jules looks amazing!!! I fell more in love with them both as each moment passed on the show…. and the wedding album is just divine! Especially page 23 and 24! heheh!
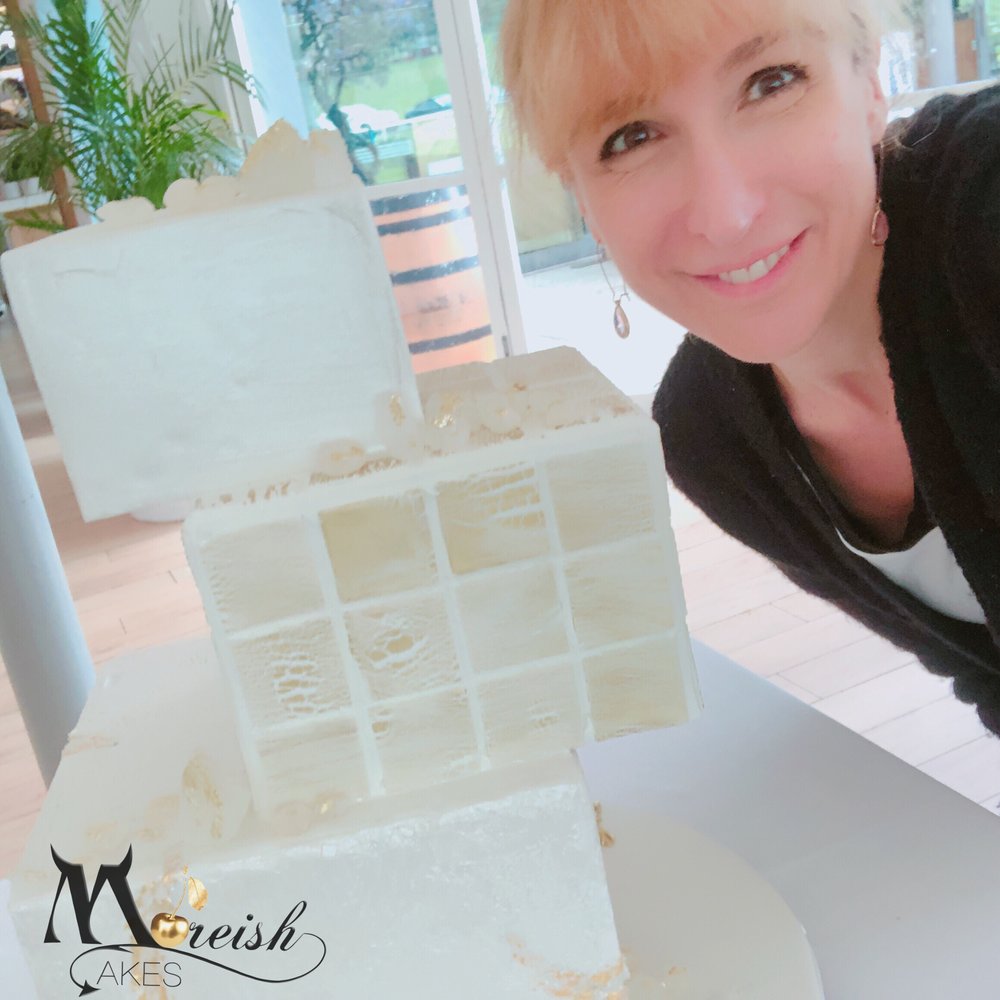
The brief for the cake was pretty brief – white, gold, elegant – knock yourself out Monica, give me a showstopper – challenge accepted!!!
The inspiration for this cake came from so many cakes I had seen over the years. From mixing textures, techniques to gravity defying all while keeping it not too OTT and making it cohesive that works together. So while it looks simple, the amount of hours and details were huge!
Ironically, a month after making this cake for MAFS, an almost identical design popped up at a Sydney Wedding. We have a conspiracy theory… they were at the MAFS wedding! hahah
The location was the gorgeous Wisteria Room in Centennial Park – we’ve delivered oddles of cakes there over the years and I still scream as we go over the speed humps.. every time… and I always nearly slip walking up the wooden walk way each time!!!
3 blocks that required an engineer to draw up the plans for me and create the structure as it’s was balanced and secured by barely an inch or 2 of cake ad any point.
So I have been asked, was it all real cake? Yes it was!
Top tier - 5” square - Dark chocolate fudge cake with vanilla bean vodka syrup and whipped choc-chip ganache.
Middle tier - 7” square - Chocolate and vanilla marble cake with Expresso syrup and Vizyon Bitter Chocolate Truffle (to die for!) covered in rich dark chocolate ganache
Bottom tier - 9” square - Dark chocolate fudge cake, Butterscotch schnapps syrup with salted caramel and dark chocolate ganache.
Brace yourself, this is a loooooooooooooooooooooooooooooooong blog as I went to the extreme of taking shots, am going to take you through it step by step!
Starting with the bottom block - sharp edged ganached surface to work with.
Rolled out some white, ready to roll, Fondtastic White Fondant (is fabulous for this job as is has a little give time for you to play with it), I sprinkled the surface with Fondant I had rolled out super thing the day before and crushed up when dry to give the effect of stone and rubble, using acetate sheets as guides, I trimmed 4 sides with over hang and attached them to the cake, keeping the acetate in place - why the acetate? Number 1, it stops the fondant from drying out too much as I stuff around with other things as later I need to texture it more and number 2, (haha) it stops my fingers and palm causing damage to the smooth surface as I have the acetate to stop the pressure points as I work - it’s an AWESOME tip for this job!
Then once I’ve stuck it to the cake, I used my Mondo Smoothers to cut the corner off to give me a good edge. The top was the same process - the over hang is what helps no get “seams” on square cakes (another excellent tip!).
Then with a ball of crushed up aluminum foil, i pushed it into the surface to texture it more and finally, using cake decorating tools, pushed in the “cracks” that I will later finish with gold and silver leaf and edible sugar crystals.
Middle tier, this one took me ages as I went for it in terms of process to achieve a truly “tiled” effect.
Cover the cube as above, but in smooth Fondtastic first - then roll out more fondant, making sure it’s on something that will protect your bench from heat.
Next up, hit the surface with a Micro blow torch - ensure, the surface is super heated but not set on fire - yes the brown spot is where I went too far….
Next, brush over the surface with the colour you want - ensure it’s mixed with rose spirit to help it dry off quickly - once it’s dry, in one direction, using your rolling pin, roll it out more - you will see the surface stretch and crack - amazing effect!.
Trim out perfect squares, leave to dry a bit and then attached them, spaced to your cake as shown below.
Next up, make a batch of Mondo Royal Icing - keeping the mixture reasonably thick, and pipe into the groove, like you were grouting - put on food grade gloves and run your finger along the groove of the royal icing to create the”grouted” finish. Told you this was a very important middle tier! The effect was awesome!!
The top tier I kept simple with only a pearl finish.
Then went back and finished the crevices of the bottom tier with silver leaf and then edges it in gold leaf - placing small sugar crystals on the silver leaf - extra sugar crystals scattered around the cake give it the final finish… perfect for the Art team on site to add flowers too later - LOVE this cake so much!!!
Want to see it onsite?
Fondant – Fondtastic
Gumpaste – Fondtastic
Boards – Mondo Boards by Kware
Gold Leaf – Over the Top Gold Leaf by Kware – Fondtastic
Silver Leaf - Over the Top Silver Leaf by Kware – Fondtastic
Sugar Crystals – Moreish Sugar Crystals – available on the website
Pearl Spray – Carolines from Lollipops
Moulds – Cakers Warehouse – Albion Park
Uniforms and Aprons – Direct Uniforms
Like what you see? Pick your fav photos and Pin it please! Help me grow this website!
Is there anything else you wanted to know about this cake? Have a comment, please leave it below and I will reply!
Want to see Jules and Cameron’s wedding album? Click here for more!
Want to learn more? Check out our Classes page for more hands on help
Cheers! Monica <3
Photo credits for the reception photos to Nine - just stunning!